Hydronic floor heating is one of the best ways to get a luxurious, warm home on a budget. It can save you money, too – if you’re looking for the lowest-cost radiant heat, hydronic heating is your best bet, and it’s often available from your utility company. This specialized heating system is simple and clean, built from the ground up.
It uses water as the heating medium to keep a house warm without creating a lot of outside pollution. They’re also very easy to operate. So you won’t have any problems installing hydronic heat – as you will with electric or other forms of heat. However, you make sure to get help from professionals with the installation process so that nothing goes wrong with the system.
Basic Working of Hydronic Heating Systems
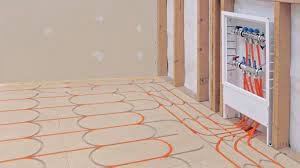
Hydronic underfloor heating Adelaide is getting popular for home heating because of its high efficiency. These systems are usually done in a way that requires drilling holes in the ground with specialized equipment to install pipes from an outdoor heat source into small copper tubing networks that lead under your flooring.
From there, cooling water is circulated through these tubes (piped through the floor) by pumps to give consumers heat and hot water, which can be used as they see fit, either hot or cold. Or, if you have radiant heat with these systems, the tubes will be installed under your flooring, and the pump will circulate water through them.
How is it’s Different from Conventional Heating Solutions?
A hydronic underfloor heating system works like radiant heating systems, but without the high maintenance costs an electric or gas-powered heating system can incur. As a result, hydronic underfloor heating systems are typically less expensive than electric or gas-powered radiant heat and offer very effective heat at lower energy consumption.
Therefore, there’s no need to worry about damaging your home while installing hydro units with professionals in this field like Eckermann Plumbing. Furthermore, unlike a hot water tank, which is expensive to repair or replace if broken in an emergency, a hydronic system is very low-maintenance. Therefore, it won’t cost you anything for any repairs (except for routine maintenance).
Advantages of Installing Hydronic Heating Systems
The cost for installation is comparatively lower than conventional heating solutions in the market. One of the major advantages of having a hydronic heating system is its lower energy requirements and higher heating efficiency. In addition, the system doesn’t waste energy, so even during heavy snow season, hydronic systems will cost you less than conventional heating in most locations. Some of the advantages of hydronic systems include the following:
- Low-cost and have low-maintenance
- Offer heating and hot water for immediate use on demand
- Environmentally friendly and safe for people with allergies or other sensitivities
- No radiators to clean, nor can there ever be one with a hydronic system
- The system is relatively silent and doesn’t clank like traditional radiators
- It can be installed quickly and easily, with minimal fuss and mess to make it blend in with your floors.
- Creates better indoor air quality, thanks to the lack of radiators.
While the installation is not that difficult, it can be costly for the first time. Hydronic heating systems require professional installation to get the most out of the system. Once you have this done, however, the heating system won’t cost you a penny in maintenance, aside from thermostat replacement or repair every few years.


Thank you for your sharing. I am worried that I lack creative ideas. It is your article that makes me full of hope. Thank you. But, I have a question, can you help me?
Thank you for your sharing. I am worried that I lack creative ideas. It is your article that makes me full of hope. Thank you. But, I have a question, can you help me?