Creative DIY concepts that are simple to perform. Halloween is not very far away and the net will soon be overwhelmed with all kinds of creatures and symbolic objects that are associated with the holiday in question. Pumpkins, lanterns, witch hats, spiders, black cats, bats, ghosts, haunted houses – it’s just a tiny fraction of the creatures of this evil universe that are celebrated every October 31st. To offer an unforgettable and terrifying experience to its guests during the Halloween party, the original thematic decoration is a real must-have. And whatever could be ampler than doing it yourself! In this article, you will find a lot of great ideas for Halloween crafts for young and old.
Customized paper cut pumpkins for an artistic decorative touch
The pumpkin is arguably one of the most characteristic symbols of Halloween and it is for this reason that so many do-it-yourselfers use it. Its importance is due to the famous legend of Jack-o’Lantern – the story of Halloween the best known. In short, he’s a drinker, mean, nutty, and very cunning character who has twice been able to trap the devil himself. In revenge, the latter encloses the gates of heaven and hell in Jack-o’-Lantern and condemns his soul to wander for eternity between the world of the dead and the living, a lantern in his hand. The light was originally made of a turnip with charcoal inside. But subsequently, it is the pumpkin that asserted itself as the symbol of the festival. Without further ado, here are some crafts for a typical Halloween decoration and landscape drawing.
Halloween manual activity for lovers
Materials and tools needed:
• Natural or artificial pumpkin
• Wallpaper
• Glue varnish
• Scissors
• Sponge brush
Production:
First, you need to make sure that your sheet of decoupage paper can wrap the integrity of your pumpkin. To do this, lay the pumpkin on the paper and start wrapping the paper around it to make sure it can cover it.
Then cover the back of the decoupage paper with a thin layer of glue varnish, using the sponge brush. Then adhere the paper to the pumpkin. Cut the excess paper off the top and bottom of the pumpkin to keep it from wrinkling. Finally, apply a layer of glue varnish on the paper and let it dry.
A plant pot made from a pumpkin
Materials needed:
• A big pumpkin
• Knife
• Scissors
• Spoon
• Bouquet
Production:
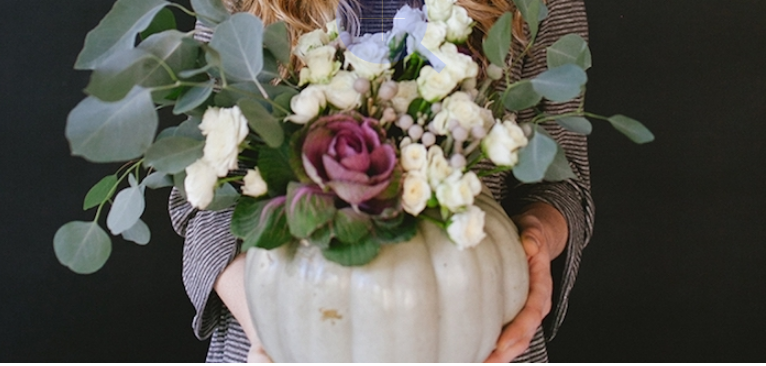
First, make a hole in the pumpkin using a knife. Cut around the stem, then dig the inside well. Then insert a floral foam sponge. The latter will serve as a support for the flowers, but what is more, will ensure their hydration. However, you can also put a glass of water like a flower vase inside.
Then, all you have to do is arrange the flowers as you wish. The bouquet you see in the photo below consists of decorative kale, small ivory-colored tea roses, eucalyptus, and junipers. There you go… an elegant bouquet with a touch of macabre.
Decorating funny pumpkins – a super simple DIY
Materials needed:
• Orange or white miniature pumpkins
• Acrylic paint
• Sponge brush and regular brush
Production:
This is a super simple project that can be done in a few simple steps. First, you need to cover the pumpkin with paint. It is best to use a primer before applying the first coat of paint. Otherwise, you can proceed directly to the application of the paint to the support, but in this case, you may need to layer two or three coats to achieve a satisfactory effect. For the first layer use a sponge brush, and for the rest – you can work with a regular brush.
Then let it dry and draw funny faces, again using acrylic paint and a regular brush. For a more lasting effect, you can finally apply a coat of varnish.
The candles are another very characteristic decoration of the festival, always following the legend that we told above. You can either make the candles yourself or buy ready-made candles to put in a pretty decorated candle holder. Then again, you can insert a candle into a carved pumpkin to create a pretty decorative lantern.
A small decorative candle holder
Materials needed:
• Colored envelopes to print for your votives
• White paper, A4 format
• Scissors
• Double-sided glue or tape
• Miniature glass jars
Production:
Print the envelopes for your glass jars on white paper and cut them out using scissors. Then wrap each of the prints around the small glass jars and attach the ends with glue or double-sided tape. It doesn’t make it any clearer than that.
DIY Halloween decoration
Materials needed:
• Orange-colored balloons (22-30 cm)
• Black adhesive paper
• Jack-o’-lantern jig
• Green pipe cleaners
• String
• Scissors
Production:
Start by printing the template and then cut out the shapes you will use, then trace them on the black adhesive paper and cut out again.
Then inflate the balloons to the desired size (it doesn’t matter, but for the project you see below, we used half-inflated balloons). Then, peel off the back of the sticky paper shapes and glue them onto the balloons.
To create the garland, tie small pieces of pipe cleaner to the base of the balloons. Repeat the same operation on all the balloons. The pipe cleaners will be used to hang the balloons on the string chosen to create the garland.
Once you have reached the desired length (5 balloons may be enough), hang the garland on the wall and your decoration is ready.
Also Read: Expressions and Crafts information